Free HVAC Inspection Checklist 2026 (Downloadable PDF + Complete Guide)
March 30, 2026 - 25 min read

March 30, 2026 - 25 min read

Table of Contents
| TL; DR: This guide includes a free, downloadable HVAC inspection checklist covering AC units, furnaces, heat pumps, and ductwork. Each checkpoint explains what to inspect and why it matters. Without an email ID, you can download it or bookmark this blog for the future. The checklist works for residential maintenance visits, pre-purchase inspections, and seasonal tune-ups. We also cover how to document findings, convert inspections into honest repair sales, and why digital checklists outperform paper every time. |
Last fall, I got called out to a home in suburban Denver for a “routine tune-up.” The homeowner said the furnace was working fine, just wanted it checked before winter. Within five minutes of pulling the front panel, I found a crack running three inches across the secondary heat exchanger. Carbon monoxide was leaking into the return air stream at 87 ppm. That family had been breathing poisoned air for weeks and didn’t know it.
I’ve been in the HVAC trade for 14 years. That call wasn’t unusual. What made it different was that the previous tech, from a different company, had “inspected” the same furnace six months earlier and signed off on it. No cracks noted, no combustion analysis performed, no CO readings taken. He’d checked some boxes on a paper form, collected the fee, and left.
That’s the problem with sloppy inspections. They don’t just cost you callbacks and bad reviews. They put people in danger.
So I built the checklist I wish every tech carrying out an HVAC business inspection had in hand. It covers air conditioning, furnaces, heat pumps, and ductwork, every single checkpoint with the reasoning behind it. I’m giving it away for free because this industry needs higher standards, not more gatekeeping.
Download the Free HVAC Inspection Checklist
KEY HIGHLIGHTS
2. Ethical Upselling Framework
Photo-backed, tiered repair presentations that build trust instead of burning it
3. Digital vs. Paper Showdown
Real-world data on why paper checklists cost you money and how digital workflows boost close rates by 35–40%
An HVAC inspection checklist is a structured, point-by-point document that guides technicians through every component of a heating, ventilation, and air conditioning system during a maintenance visit or diagnostic call. It ensures nothing gets skipped, creates a documented record for the customer, and protects your company from liability.

A solid HVAC system inspection covers four major areas: the cooling system (air conditioner or heat pump), the heating system (furnace, boiler, or heat pump in heating mode), the air distribution system (ductwork, registers, returns), and the controls (thermostat, safety switches, electrical connections).
The difference between a professional residential HVAC inspection and a hack job comes down to one thing: whether the tech actually tests performance or just eyeballs components.
A proper inspection includes measurable readings, superheat, subcooling, delta T, static pressure, combustion efficiency, not just “looks good” scribbled on an HVAC inspection form.
If you’re building out a complete maintenance program for your HVAC business, pair this checklist with a structured HVAC maintenance plan that keeps customers on a recurring schedule.
This section covers split-system central air conditioners. If you’re inspecting a heat pump, use this section for cooling mode and reference the heat pump section below for heating-specific checks.
1. Inspect the condenser coil for dirt, debris, and fin damage. A dirty condenser coil increases head pressure, forcing the compressor to work harder and shortening its lifespan. Bent fins reduce airflow across the coil. Clean coils can improve system efficiency by 5–15%.
2. Check condenser fan motor operation and blade condition. Listen for bearing noise and wobble. A failing condenser fan motor leads to high head pressure and compressor overheating. Verify the blade isn’t cracked; a broken blade at 1,100 RPM becomes a projectile.
3. Measure condenser fan motor amp draw. Compare against the nameplate rating. An amp draw over 110% of the rated FLA indicates a motor approaching failure. Document the reading so you can trend it over time.
4. Inspect the compressor for oil stains and physical damage. Oil stains around the compressor base or on refrigerant line fittings usually mean a refrigerant leak. A leaking compressor isn’t just an efficiency problem; it’s a repair-or-replace conversation.
5. Measure compressor amp draw (RLA) against nameplate. Running amps significantly above the rated load amps signals internal wear. Running amps well below can indicate a lost charge or a valve issue. Either way, document it.
6. Check refrigerant charge using superheat and subcooling. This is non-negotiable. Eyeballing frost on the suction line is not a substitute for actual measurements. On a fixed-orifice system, check superheat. On a TXV system, check subcooling. A system that’s 10% low on refrigerant charge runs 20% less efficiently (DOE).
7. Inspect the contactor for pitting, burn marks, and proper engagement. A pitted contactor creates resistance, which creates heat, which creates a fire risk. Contactors are cheap; replace them at the first sign of significant pitting.
8. Check the capacitor(s) with a capacitance meter. Capacitors degrade over time. A run capacitor that’s dropped more than 10% from its rated microfarad value is causing the motor to run hot. Weak capacitors are the number one cause of no-cool calls in summer.
9. Verify the disconnect is properly rated and in good condition. Check for melted lugs, discolored wiring, or an undersized disconnect. This is a safety item and a code item.
10. Inspect the refrigerant line set (suction and liquid lines). Check insulation on the suction line; missing or deteriorated insulation reduces efficiency and causes condensation that can damage ceilings and walls. Look for kinks, rub-throughs, and oil stains at fittings.
11. Verify the condensate drain is clear (if applicable). Some units have a secondary condensate line at the outdoor unit. A clogged drain leads to water damage and potential mold growth inside the home.
12. Check the pad or mounting for level and stability. A condenser that’s severely off-level stresses refrigerant lines and can cause oil migration issues in the compressor. Slight settling is normal; a 15-degree lean is not.
13. Inspect the evaporator coil for dirt and ice formation. A dirty evaporator coil drops airflow across the coil, lowering suction pressure and eventually freezing the coil. If it’s iced up when you arrive, you have either an airflow problem or a charge problem — figure out which before just defrosting it.
14. Measure supply and return air temperatures (delta T). Proper delta T across the evaporator is typically 16–22°F. A delta T below 14°F usually means low charge or high airflow. Above 24°F usually means low airflow or a dirty coil.
15. Check the blower motor and blower wheel. A dirty blower wheel can reduce airflow by 20–30%. Listen for bearing noise. Check amp draw against nameplate. On ECM motors, verify the motor is ramping properly and not short-cycling.
16. Inspect the condensate drain pan and primary drain line. Pour water into the drain pan and confirm it flows freely. A clogged primary drain line is the number one cause of water damage claims in residential HVAC (ACCA). Check the float switch while you’re at it, pour water into the pan, and verify the switch kills the system.
17. Verify the air filter is clean and properly sized. A restricted filter chokes the system. A filter that’s too small lets debris bypass into the coil. Document the filter size and condition so the homeowner knows what to buy.
Gas furnace inspections carry the highest stakes of any residential HVAC work. A missed, cracked heat exchanger or malfunctioning safety control can kill someone. Take this section seriously.
1. Perform a visual inspection of the heat exchanger. Use a mirror and flashlight on accessible sections. On induced-draft furnaces, inspect through the burner ports with the burners off. Look for cracks, rust-through, and discoloration. Any visible crack is an immediate red-tag situation.
2. Perform a combustion analysis. Use a combustion analyzer to measure CO, CO2, O2, and stack temperature at the flue. This is the most important test in the entire furnace inspection. Ambient CO in the supply air above 9 ppm (or any CO in the supply air, depending on your jurisdiction) is a red flag. Document all readings.
3. Check for carbon monoxide in the supply air stream. Separate from the flue gas test. Place your CO detector in the supply plenum downstream of the heat exchanger. This is how you catch a cracked heat exchanger that isn’t visible. Any CO in the supply air means combustion gases are crossing into the living space.
4. Inspect the burners for even flame and proper color. Blue flame with small yellow tips is normal on atmospheric burners. Orange or yellow flames indicate dirty burners, incorrect gas pressure, or improper air-to-fuel ratio. Uneven flames across the burner rack can indicate a cracked heat exchanger.
5. Measure gas pressure (manifold pressure). Verify manifold pressure matches the rating plate spec. On natural gas, the typical manifold pressure is 3.5″ WC. Incorrect gas pressure affects efficiency, flame stability, and heat exchanger life.
6. Inspect the flame sensor and clean it if needed. A dirty flame sensor is the single most common cause of furnace short-cycling and no-heat calls. Clean it with a fine emery cloth or a dollar bill. Measure the flame signal in microamps; most manufacturers want to see at least 2–4 µA.
7. Check the ignition system (hot surface igniter or spark igniter). Hot surface igniters are consumable; they crack and fail. Inspect visually for cracks. If the igniter is original to a 10+ year old furnace, recommend proactive replacement. They’re $15 wholesale and $200 in an emergency call.
8. Inspect the draft inducer motor. Listen for bearing noise. Check for cracks in the housing. Verify it starts before the gas valve opens (safety sequence). A leaking inducer housing can pull combustion gases into the mechanical room.
9. Verify all safety controls function properly. This includes the high-limit switch, rollout switches, pressure switches, and flame rollout sensors. Tripped rollout switches are a major safety indicator; don’t just reset them without investigating why they tripped.
10. Inspect the flue pipe and venting system. Check for proper slope, secure joints, and corrosion. Verify clearances from combustibles meet code. On high-efficiency condensing furnaces (90%+ AFUE), inspect the PVC vent and intake pipes for blockage, sagging, and proper termination location.
11. Check the condensate drain and trap (condensing furnaces). High-efficiency furnaces produce acidic condensate. A clogged trap or drain line shuts the furnace down via the pressure switch. Flush the trap and verify drainage.
12. Inspect the blower motor, capacitor, and blower wheel. Same as the AC section, but also verify the furnace blower runs on the correct speed tap for heating mode (typically a lower speed than cooling). ECM motors should be checked for proper ramp-up.
13. Measure temperature rise across the heat exchanger. The temperature rise (supply temp minus return temp) must fall within the range listed on the furnace rating plate. Out-of-range temperature rise usually means incorrect airflow — either too high or too low.
14. Inspect electrical connections and wiring. Tighten any loose connections. Look for scorched wire nuts, melted insulation, or undersized wiring. Loose connections cause resistance, heat, and eventually failure.
15. Test the thermostat operation and calibration. Verify the thermostat calls for heat properly and that the furnace responds within the expected sequence timing. Check the heat anticipator setting on older thermostats. Confirm the fan-on and fan-auto settings work correctly.
16. Check the return air pathway for combustion air contamination. On furnaces located in utility closets or tight mechanical rooms, verify there’s an adequate combustion air supply per code. A starved furnace produces CO. This is especially important if any remodeling has been done since installation.
Heat pumps operate as both a cooling and heating system, so they get double the wear. In addition to all the AC inspection points above (which apply to cooling mode), check these heating-specific items:
1. Test the reversing valve operation. Cycle the system between heating and cooling and verify the reversing valve switches properly. Listen for a “whoosh” sound when the valve shifts. A stuck reversing valve is a common and expensive failure.
2. Measure heating mode performance (COP verification). Measure supply and return temperatures in heating mode. A heat pump should deliver a delta T of 15–30°F in heating mode, depending on outdoor temperature. Poor delta T means low charge, airflow issues, or a failing compressor.
3. Inspect the defrost control board and sensors. Heat pumps frost up in heating mode — that’s normal. What’s not normal is a unit that stays frosted. Check the defrost thermostat or sensor, the defrost timer or demand-defrost board, and verify the system goes into defrost properly.
4. Verify the defrost cycle initiates and terminates correctly. Force a defrost cycle if you can. Verify the reversing valve shifts, the outdoor fan shuts off, and the auxiliary heat energizes (if configured). A defrost cycle that doesn’t terminate properly will ice-damage the outdoor coil.
5. Check auxiliary/emergency heat strips. Measure and draw on each heat strip and compare to the rated values. Check sequencers for proper staging. Verify that the emergency heat mode on the thermostat activates the strips and locks out the compressor.
6. Inspect the outdoor coil in heating mode for airflow restriction. Leaves, pet hair, cottonwood seeds all of these reduce heating performance. In fall and winter, check for ice buildup patterns that suggest the defrost system isn’t working.
7. Verify proper refrigerant charge in heating mode. This is different from cooling mode. In heating mode, you measure subcooling at the outdoor coil (it’s now acting as the evaporator in reverse). Many techs only check the charge in cooling mode and miss heating-mode issues.
8. Check the accumulator for frost or ice. An iced accumulator indicates liquid refrigerant flooding back to the compressor. This will kill a compressor. Causes include low outdoor airflow, a restricted metering device, or incorrect charge.
9. Inspect the base pan heater (if equipped). In cold climates, heat pumps have a crankcase or base pan heater to prevent ice buildup. Verify it’s energized and working — a frozen base pan can seize the fan.
10. Test the balance point and lockout settings. Verify the outdoor temperature lockout (if configured) matches the manufacturer’s recommendation for compressor operation. Check that the thermostat’s balance point settings are correct for the local climate.
Ductwork is the most neglected part of any residential HVAC inspection. According to Energy Star, the average duct system loses 20–30% of conditioned air through leaks, holes, and poorly connected joints. That means even a perfectly tuned system wastes a third of its output if the ducts are bad.
1. Measure total external static pressure (TESP). This is the blood pressure reading of the HVAC system. Measure at the supply plenum and return plenum. Total static pressure above 0.5″ WC on a standard residential system indicates restriction. High static pressure kills blower motors and reduces comfort. ACCA Manual D recommends a maximum of 0.5″ WC for most residential systems.
2. Inspect accessible ductwork for disconnections and damage. Crawl the attic or crawl space and physically look. A flex duct that’s kinked, crushed, or disconnected is incredibly common, especially in attics where someone stepped on it. A single disconnected duct run can waste 20% of the system’s capacity.
3. Check duct insulation and vapor barrier integrity. Uninsulated ducts in unconditioned spaces (attics, crawl spaces) cause massive energy loss and condensation problems. Look for torn vapor barriers, compressed insulation, and areas where duct insulation has fallen off.
4. Inspect duct connections and sealing at boots, plenums, and takeoffs. Duct tape (ironically) fails on ductwork within a few years. Mastic or foil-backed tape is the proper sealing method. Check every accessible joint.
5. Verify proper return air sizing. Undersized return air is the most common duct design deficiency in residential HVAC (ACCA). Symptoms include high static pressure, slamming doors when the system runs, and air starvation noise at the return grilles. This ties into proper HVAC dispatching, knowing what to look for saves your team from repeat visits.
6. Check the supply register airflow and balancing. Use a flow hood or an anemometer to check CFM at each supply register. Compare room-to-room delivery. Significant imbalances cause hot and cold spots that generate customer complaints.
7. Inspect the air filter rack or housing. Look for bypass gaps around the filter. A filter with a 1-inch gap around the edges might as well not be there. Verify that the filter rack seals tightly and that the correct filter size is being used.
8. Look for evidence of moisture, mold, or pest activity in the ductwork. Condensation stains on duct board, visible mold at register boots, or rodent droppings in the duct system are health hazards. Document them and recommend remediation by a qualified specialist.
9. Check for duct leakage at the air handler cabinet. The air handler itself is a major source of leakage. Check the coil access panel, filter access door, and bottom seam. A leaky air handler in a hot attic pulls unconditioned air directly into the system.
Here’s a reference table for the most common residential HVAC inspection findings. Use this to explain issues to homeowners in plain language and set proper expectations.

| Finding | What It Means | Urgency | Est. Cost |
| Cracked heat exchanger | Combustion gases leaking into the living space – CO risk | Emergency | $1,500–$3,500 (or full replacement) |
| Refrigerant leak | System losing charge; poor cooling, compressor damage risk | High | $300–$1,500 depending on location |
| Failed capacitor | Motor won’t start or runs inefficiently; common summer failure | High | $150–$300 |
| Dirty evaporator coil | Reduced airflow, ice formation, and poor efficiency | Moderate | $200–$500 for cleaning |
| Dirty condenser coil | High head pressure, compressor stress, and higher bills | Moderate | $100–$250 for cleaning |
| Clogged condensate drain | Water damage risk, system shutdown (if float switch works) | Moderate | $75–$200 |
| Weak blower motor | Reduced airflow, hot/cold spots, high static pressure | Moderate | $400–$900 |
| Failed flame sensor | Furnace short-cycling, intermittent no-heat | Moderate | $100–$200 |
| Worn contactor | Electrical resistance, overheating, and potential fire risk | Moderate | $100–$250 |
| Disconnected ductwork | Conditioned air dumping into attic/crawlspace; huge waste | Moderate | $150–$400 |
| Missing duct insulation | Energy loss, condensation, and potential mold | Low–Moderate | $200–$600 |
| Oversized or undersized system | Comfort issues, short cycling, and humidity problems | Low (informational) | $5,000–$12,000 (replacement) |
| Thermostat miscalibration | Temperature swings, excessive cycling | Low | $0–$300 |
A thorough inspection means nothing if the customer doesn’t understand what you found. Here’s how to document and present your findings so homeowners trust you and take action.
Before you clean, repair, or touch anything, photograph it. A photo of a cracked heat exchanger or a filthy coil communicates urgency faster than any verbal explanation. Take close-up shots and wide-angle context shots.
Photo checklist:
Ensure you pick the right AI-powered data management software that supports high-quality images to send them.
Don’t write “Low superheat — possible TXV restriction.” Write: “The cooling system is not removing heat efficiently because a metering component is restricting refrigerant flow. This reduces cooling capacity and puts stress on the compressor. Recommended repair: replace the metering device.”
Use a simple three-tier rating that homeowners immediately understand:
Dirty evaporator coil: “Your indoor cooling coil has significant dirt buildup restricting airflow. This forces the system to work harder, increases your energy bills, and can cause ice formation that shuts the system down. I recommend a professional coil cleaning today.”
Weak capacitor: “The capacitor that helps your compressor start has lost 18% of its rated capacity. It still works today, but it’s on borrowed time. When it fails, usually on the hottest day of summer, the AC won’t turn on. Replacing it now costs $200. An emergency call costs $400+.”
Let me be direct: if you’re doing thorough inspections and NOT presenting repair options, you’re doing the customer a disservice. They’re paying you to find problems. Not telling them about those problems isn’t “being nice”, it’s negligent.
That said, there’s a right way and a wrong way to handle this.

1. Present findings with evidence, not pressure. Show the photos. Share the readings. Explain what the numbers mean. Let the data do the selling.
2. Offer tiered options. Always present at least two options: the minimum repair needed for safety and function, and the recommended repair for optimal performance and longevity. On aging systems, add a third option: replacement with estimated ROI.
3. Separate “must-do” from “should-do” from “nice-to-do.” A cracked heat exchanger is a must-do. A weak capacitor is a must-do. A duct sealing upgrade is a nice-to-do. Customers respect techs who prioritize honesty.
4. Never manufacture urgency. If something is genuinely dangerous, say so and explain why. If something is a wear item that will need attention in 1–2 years, say that instead. Customers remember honesty, and they call you back.
5. Document the declined repairs. If a customer declines a recommended repair, document it in writing. This protects you legally and creates a natural follow-up opportunity. “Last visit, we noted your capacitor was testing weak. Want us to replace it during today’s tune-up?”
HVAC contractors who use structured inspection checklists with photo documentation close 35–40% more repair work than those who rely on verbal descriptions alone (ACCA contractor survey). That’s not because they’re better salespeople, it’s because customers understand and trust what they can see.
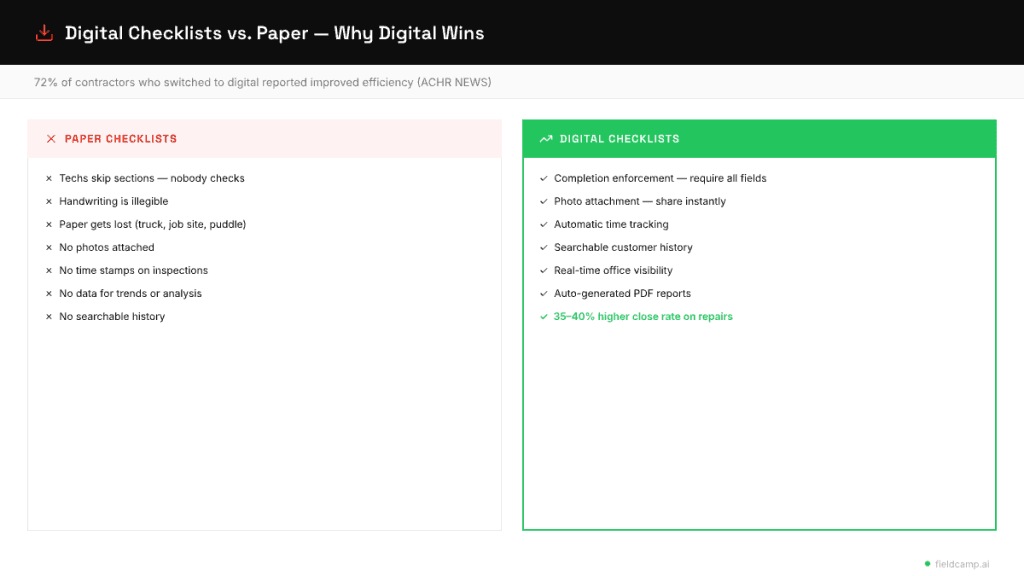
According to a 2026 survey by the ACHR NEWS, 72% of HVAC contractors who switched to digital workflows reported improved technician efficiency, and 64% saw an increase in customer satisfaction scores.
The industry is moving toward digital-first operations; 2026‘s biggest HVAC industry trends all point toward mobile-first field service platforms as a competitive requirement, not a luxury.
Your checklist software should offer:
FieldCamp checks every one of those boxes: custom digital checklists, photo documentation, automated customer reports, and full integration with scheduling and dispatch. It’s built for exactly this workflow.
At a minimum, twice per year, once before cooling season (spring) and once before heating season (fall). This lines up with manufacturer warranty requirements and catches problems before peak demand. If you’re selling maintenance agreements, build this into your HVAC maintenance plan as a twice-yearly visit.
A proper residential HVAC inspection, covering heating, cooling, and ductwork, takes 60–90 minutes for a single system. Techs who are in and out in 20 minutes aren’t doing the job. They’re checking boxes without checking the equipment.
Residential HVAC inspection costs typically range from $75 to $200, depending on your market and what’s included. Most contractors offer inspections as part of a maintenance agreement at a discounted rate, typically $150–$300/year for two visits.
An inspection is diagnostic; you’re evaluating the condition, measuring performance, and documenting findings. A tune-up includes the inspection plus maintenance tasks like cleaning coils, changing filters, lubricating motors, and tightening electrical connections. Most customers expect (and should receive) both.
Yes, but general home inspectors typically perform a visual and operational check only — they turn it on, verify it heats and cools, and note the age and visible condition. They don’t measure refrigerant charge, perform combustion analysis, or check static pressure. For a real estate transaction, a dedicated HVAC inspection by a licensed technician is always recommended.
The most common failures I see are: dirty evaporator and condenser coils, weak or failed capacitors, clogged condensate drains, dirty flame sensors, and restricted airflow from dirty filters or undersized return ductwork. Serious but less common: cracked heat exchangers, refrigerant leaks, and failed compressors.
Absolutely. Every single time. A detailed inspection report with photos and condition ratings builds trust, justifies your service fee, and creates a documented record that drives future repair and replacement decisions. Never leave a job without handing over a report.
This checklist is designed for residential split systems and packaged units. Commercial systems, rooftop units, chillers, VRF systems, and built-up air handlers have additional inspection requirements. However, many of the fundamentals (electrical checks, refrigerant verification, airflow measurement, combustion analysis) apply to both.
At minimum: a digital manometer (for static pressure), a combustion analyzer, a refrigerant manifold gauge set or digital gauges, a multimeter, a clamp-on ammeter, a temperature probe set (for delta T and temperature rise), an infrared thermometer, a capacitance meter, a CO detector, and a camera. Total investment: $1,500–$3,000 for quality instruments.
No building code requires a specific checklist format. However, manufacturer warranty requirements, EPA Section 608 regulations (for refrigerant handling), and OSHA standards all require documented procedures and proper testing. Using a standardized checklist is the easiest way to demonstrate compliance and protect your business legally.